So you want to learn how to install Jeep decals, ok well maybe not Jeep decals specifically, but you want to install some sort of vinyl or cut decals onto your Jeep.
I get it. I don’t think I’ve ever seen an off-road Jeep without at least one decal. It could be the name of your Jeep club, or some trail you’ve conquered. Or it might even be the name of your Jeep.
But if you’re new to the Jeep lifestyle you are probably, like me, worried that you’re going to mess it all up.
Me? I’ve got two left thumbs and I missed the line when the good Lord was handing out any kind of handyman skills. I really had no clue about how to do it, but I wanted to do it right. So for my first larger decal install, I took my Jeep down to Austin Extreme Graphics. They had great reviews on the Internets and I got a world class education in less than 30 minutes from the pros there.
I’ll do my best to describe the process here, then if you want to install Jeep decals yourself you can give it a go. Or if you’d rather have the pros install Jeep decals on your rig, you can do that too. I won’t judge you. But either way, information is power.
Install Jeep Decals: Step 1 – Remove Existing Decals
The first step is to figure out where you want to put your new decal. If you have existing decals obviously you need to remove them first. I watched as Brian (manager) and Orrin (installer) at Austin Extreme Graphics went to work removing our “Rubicon” decals.
The first thing they did was kind of freaky actually. They each armed themselves with a little propane torch.
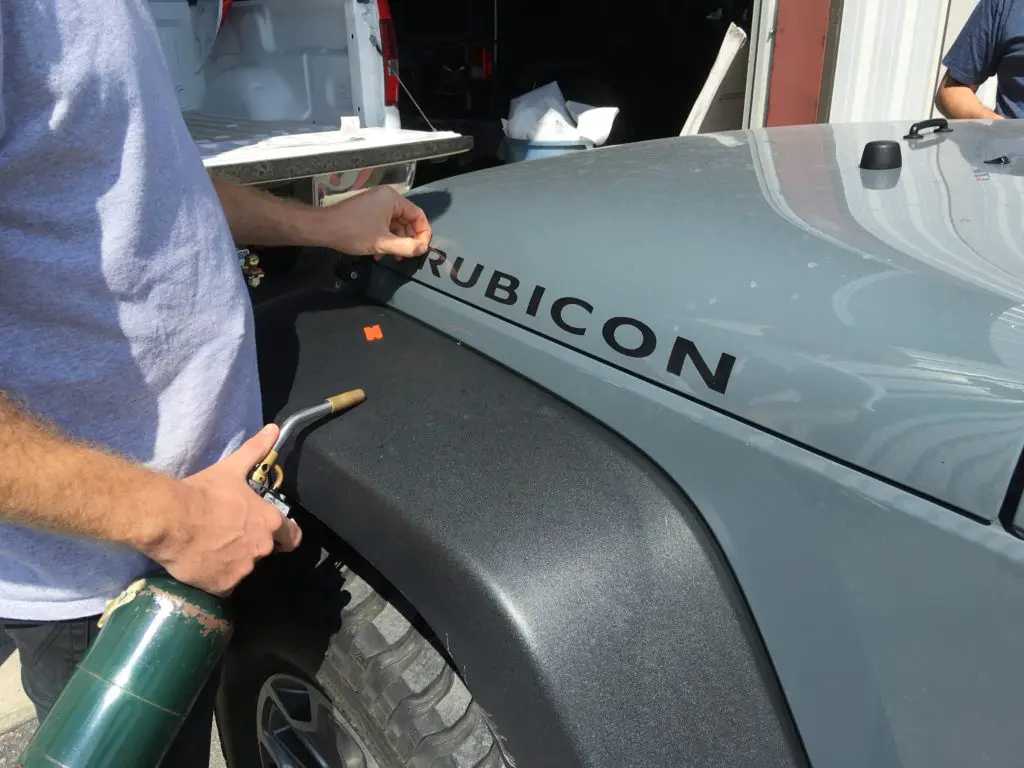 It freaked me out a little when the first thing the pro installers did was grab a propane torch.
They whisked the torch LIGHTLY over the existing decal with a quick back and forth motion, almost a flick of the wrist. Simply put, this torching heats the adhesive and makes it easier to remove.
Then they simply peeled off the Rubicon sticker letter by letter on each side. It was strange to see our Jeep without the Rubicon decal, but I knew good things were happening.
After removing the existing decals they sprayed a solution called “Rapid Remover” which is available at most any Wal-Mart (or similar box store) onto the gunky residue left behind by the old decals.
 Brian, manager at Austin Extreme Graphics using Rapid Remover to take off the gunky residue left behind by the removed decals.
They wiped the residue off using the Rapid Remover and a lint-free rag.
Install Jeep Decals: Step 2 – Clean and Prep the Surface
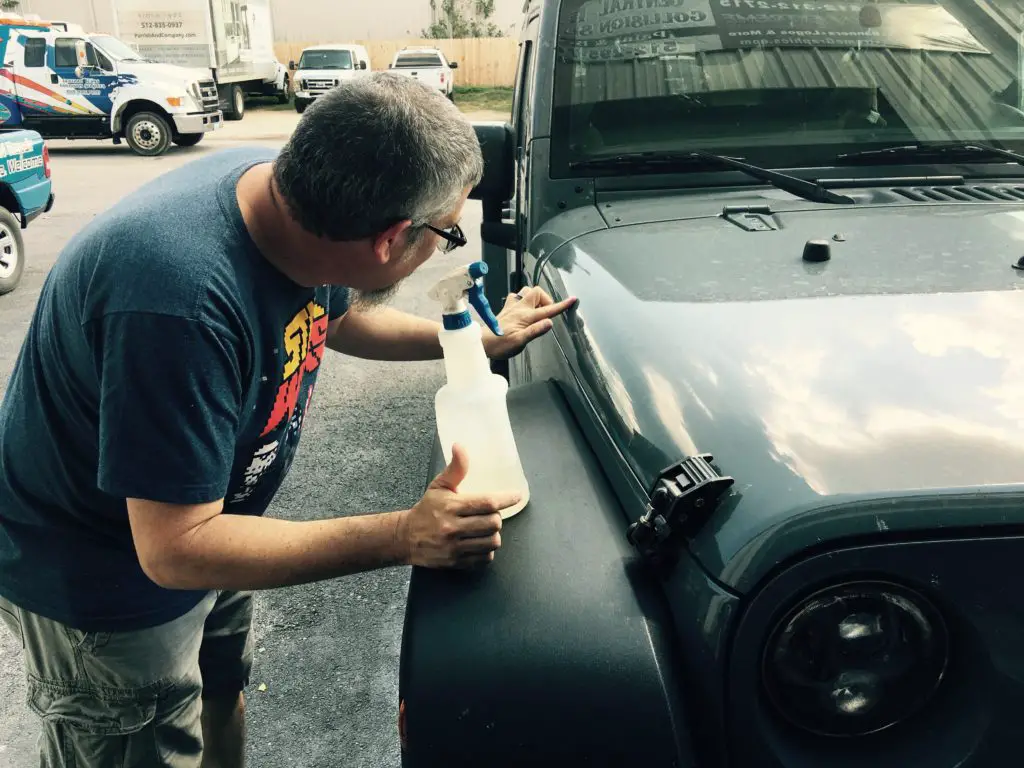
Next, Brian and Orrin grabbed some Windex to begin the initial cleaning of the surface. Now, I say initial because this step is critical, and the step after the Windex in this section is just as critical.
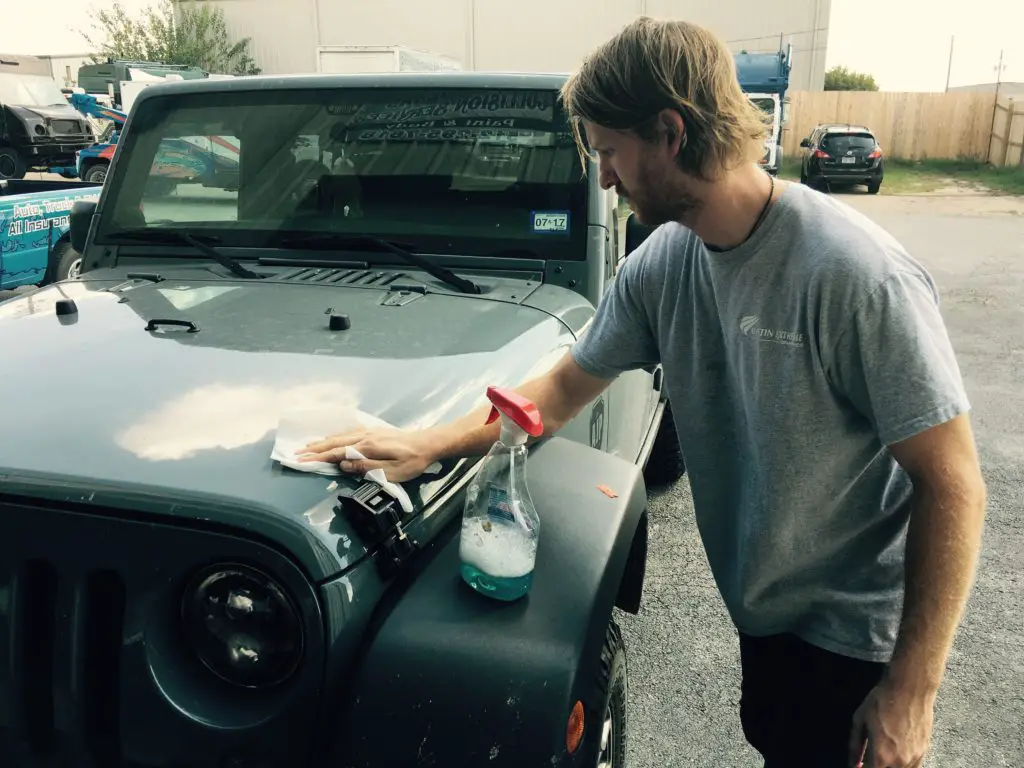 Orrin using Windex as the first part of the clean and prep stage. Don’t forget to use denatured alcohol after the Windex! You don’t want the ammonia from the Windex on the surface of your Jeep when you install Jeep decals.
They spent more time cleaning and prepping the surface getting it ready to install Jeep decals on my rig than they did installing the decals themselves.
So if you plan to install Jeep decals yourself, take your time on this step!
If you have any residue, dust, dirt, tree sap or other foreign substance left behind, it will show through your new decals like a wart on a witch’s nose. Nobody wants that. Plus custom decals can be pricey.
After the windex, they then took out a second spray bottle. This time it was denatured alcohol. This step is just as critical. You don’t want any of the ammonia residue left behind from the Windex, and if there is anything else that the Windex didn’t get, the denatured alcohol will get it.
Let me tell you, when Brian and Orrin were done with this step, the hood of my Jeep where the decals were about to be installed were cleaner than when I bought it. So clean in fact, that Brian jokingly asked, “Do you want to see the real color of your Jeep?”
 The real color of my Jeep, “Anvil” shines through after the thorough cleaning.
Install Jeep Decals: Step 3 – Measure and Tape
Now that the surface was clean, they wasted no time in getting the decals into position. You don’t want to delay in this step, because residue (even stuff you can’t see) is landing on your Jeep. Better to get the decals into an approximate position as quickly as possible.
 Getting the decals into position immediately after cleaning is a best practice.
So without hesitation, the pro installers at Austin Extreme Graphics got my decals into position. It wasn’t the final position the decals would be in, but it was the general position. This prevented anything else from landing on the clean and prepped surface. They simply taped both sides of the decal to the Jeep. Then they paused.
It was now that they started looking at specific measurements. Brian broke out a tape measure and measured one side of the Jeep first until I was happy with the placement. Everyone’s decals will be different obviously so specifics here don’t matter.
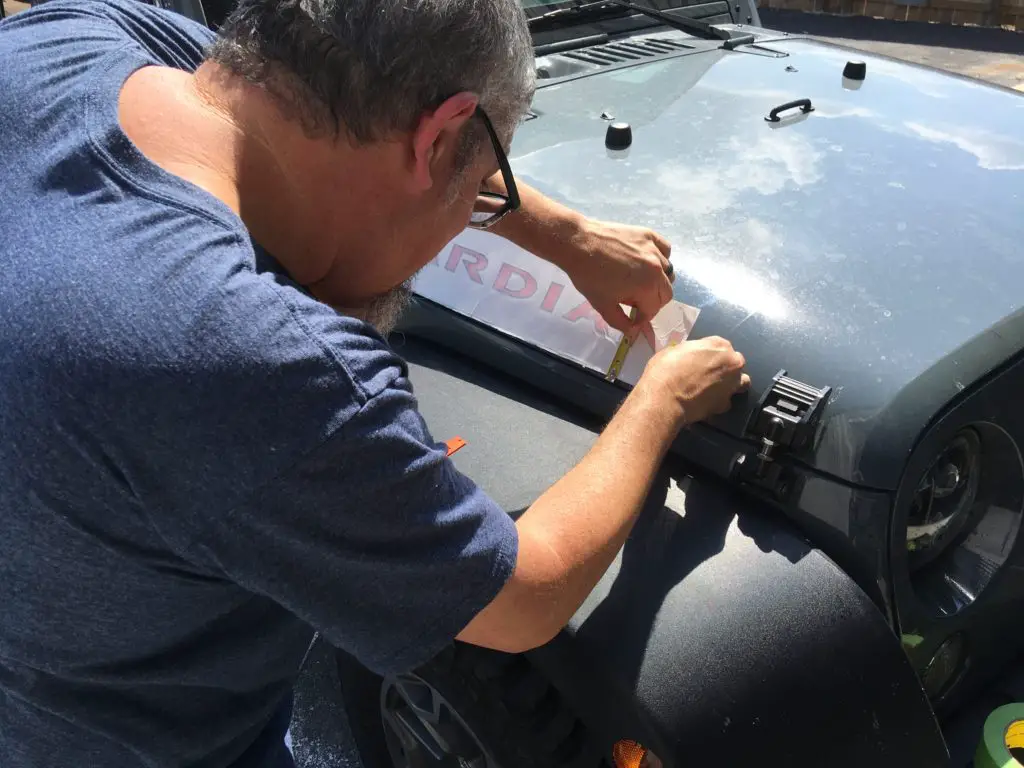 Brian must have measured and remeasured five times to make sure he had it just right.
What does matter is that once you like the decal placement on one side of your Jeep, if you are going to install Jeep decals on the other side of your Jeep, you need to record your measurements so they can be duplicated.
So once Brian showed me a placement I was comfortable with, he rattled off the measurements to Orrin on the other side who in effect mirrored the placement and taped off the decal.
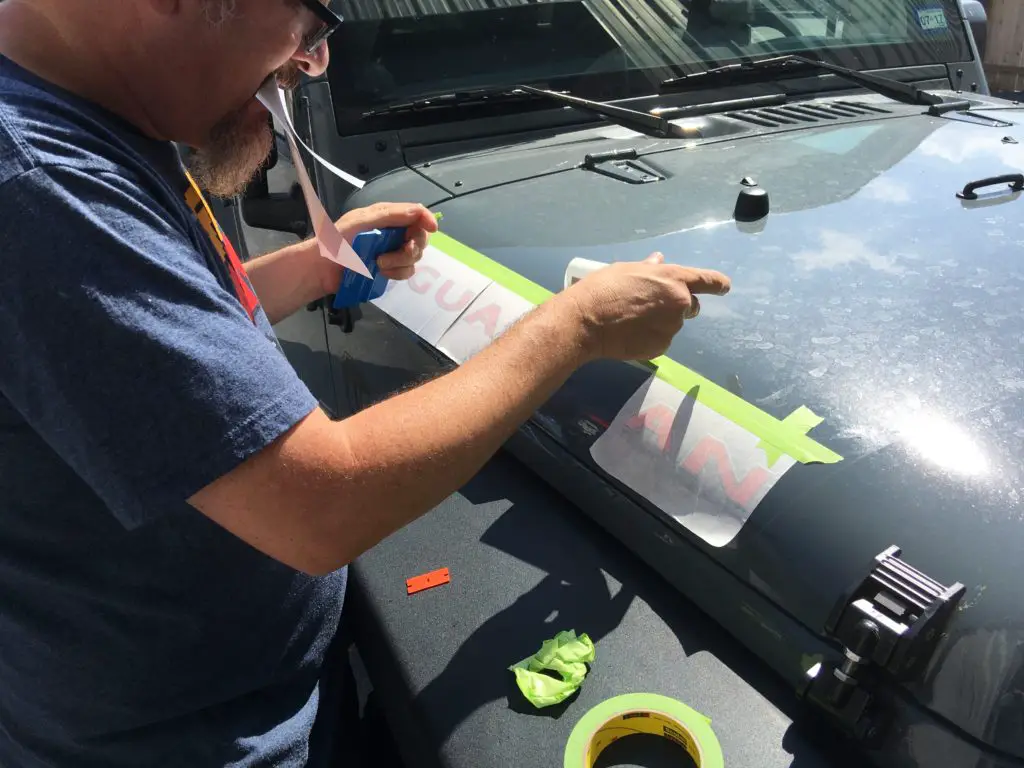
It is important to note that once the decals were placed, the tape was switched to a hinge-like taping where only the top side of the decal was taped. All other tape was removed. This is important in the next step.
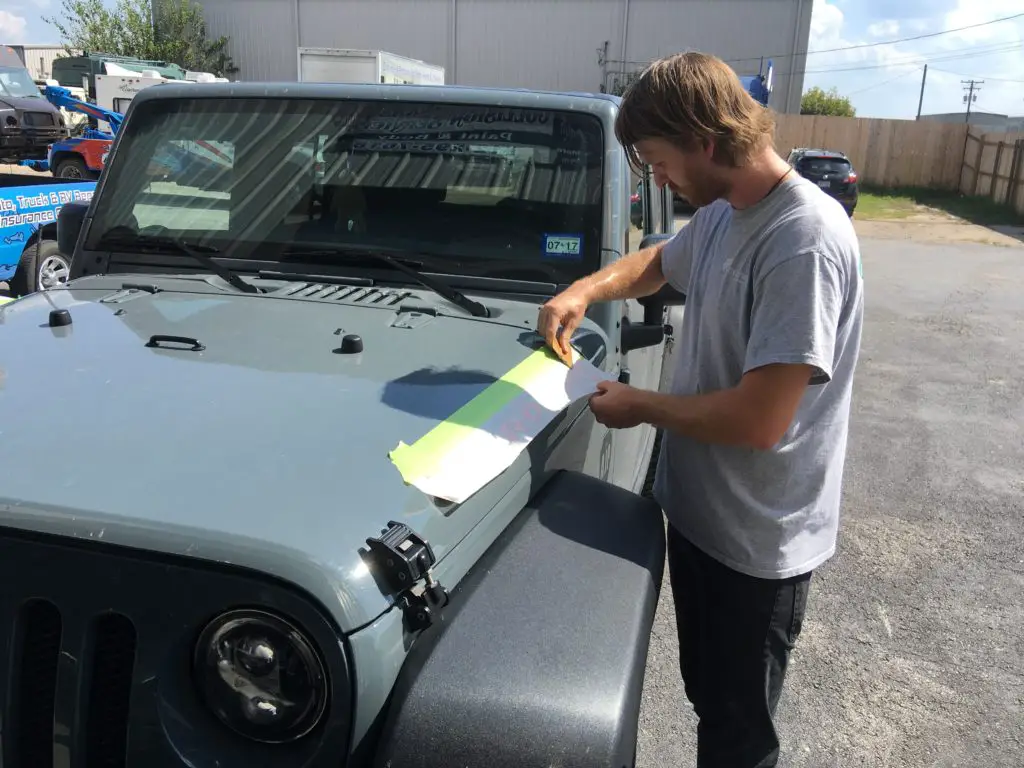
Install Jeep Decals: Step 4 – Install the Jeep Decals
Now that the decals were in their final placement with hinge-like taping on the top of the decal only, the install was about to happen.
What I found interesting here is that Brian and Orrin each used a different method of decal application.
 Brian used a cut decal method for the install.
Brian cut my decal about every two letters into sections. Fellow Austin Extreme Graphics installer Lee, came in to help him on the passenger side. This cutting made for a smaller footprint for each section of the decal they were working with.
 Orrin used an install method that did not involve cutting the decal. Notice that the tape is only on the top of the decal now and acts like a hinge.
Meanwhile, Orrin kept the entire decal in one piece on the driver’s side.
Either way, they both flipped up the decal on the hinge-tape and peeled off the backing. Then, they laid the decal against the Jeep. After the decal was down they used what looked like a plastic putty blade you’d use for drywall spackle and proceeded to press the decal down in a firm and sweeping motion. This motion started at the center of the decal and moved outward towards the ends of the lettering.
The purpose of this was to set the decal onto the vehicle and remove any air bubbles that may have occurred when placing it down after removing the backing. When you start at the center of the decal and push outward you are allowing any tiny air bubbles to be expelled from underneath the surface of your decal.
They took their time with this step as well, being very thorough before peeling back the top layer of the decal.
Install Jeep Decals: Step 5 – Peel Back the Top Layer
It was time for the big reveal. The old decals were removed, the surface was prepped and cleaned, the placement was decided upon and the decals were pressed down.
All that was left was to pull back the top layer on the decal. I captured Orrin peeling off the top layer on video. Note that he pulled it off at an angle (about 45 degree) and speed was not a factor.
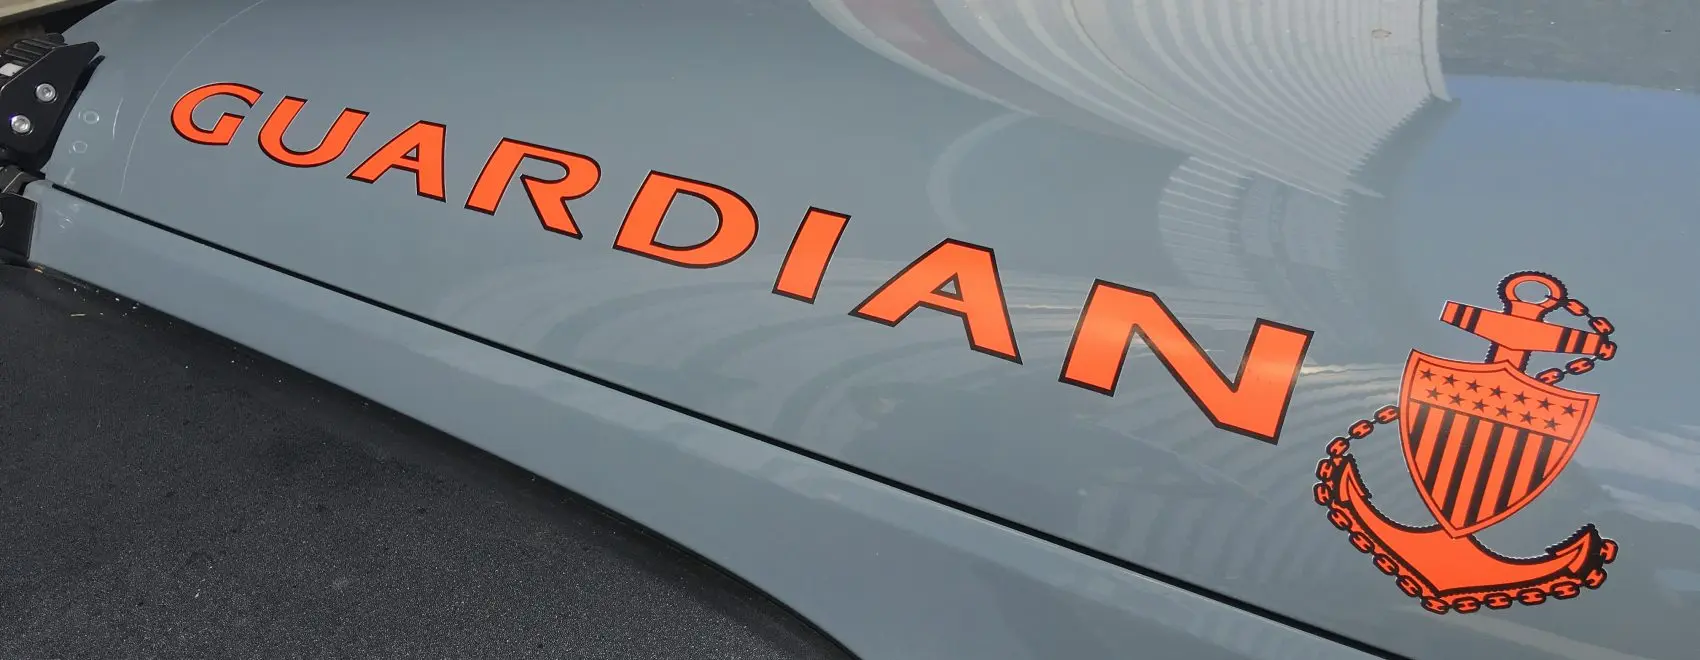
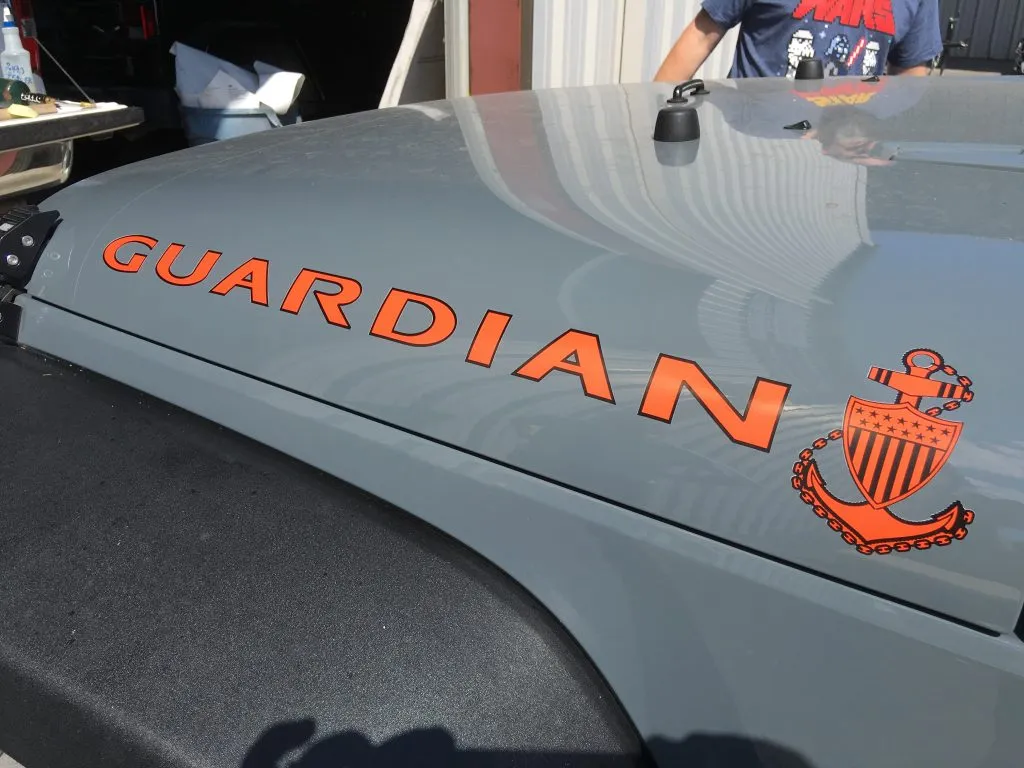
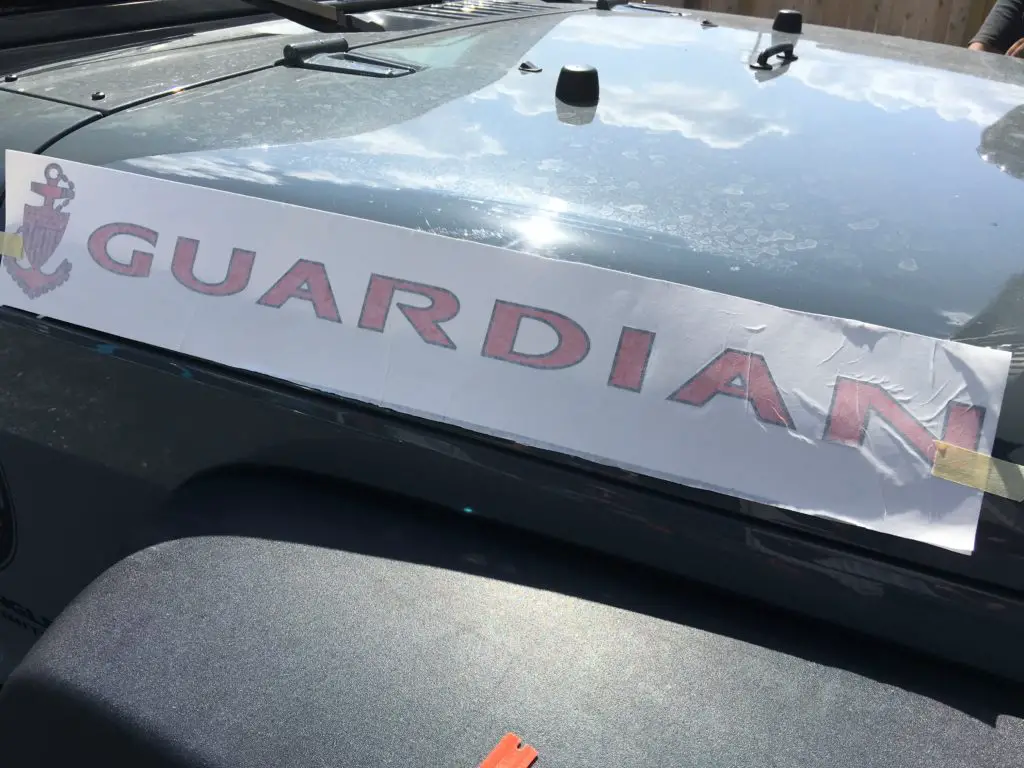
So here’s the reveal of the decals on our Jeep who is forever more referred to as GUARDIAN:
Install Jeep Decals: Summary and Final Thoughts
The guys at Austin Extreme Graphics did a fantastic job. No bubbles, perfectly lined up and mirrored on both sides. I’d highly recommend them if you are in the Central Texas area and don’t feel like tackling this yourself.
But if you do want to tackle it, I think it can be done, and done well if you follow the above steps. Don’t rush through the prep and cleaning stage. Take your time with the measurements and give it a go.
As far as our Jeep? Well, they say you don’t give your Jeep a name, it will whisper it to you when it is ready. Not entirely sure if this is accurate.
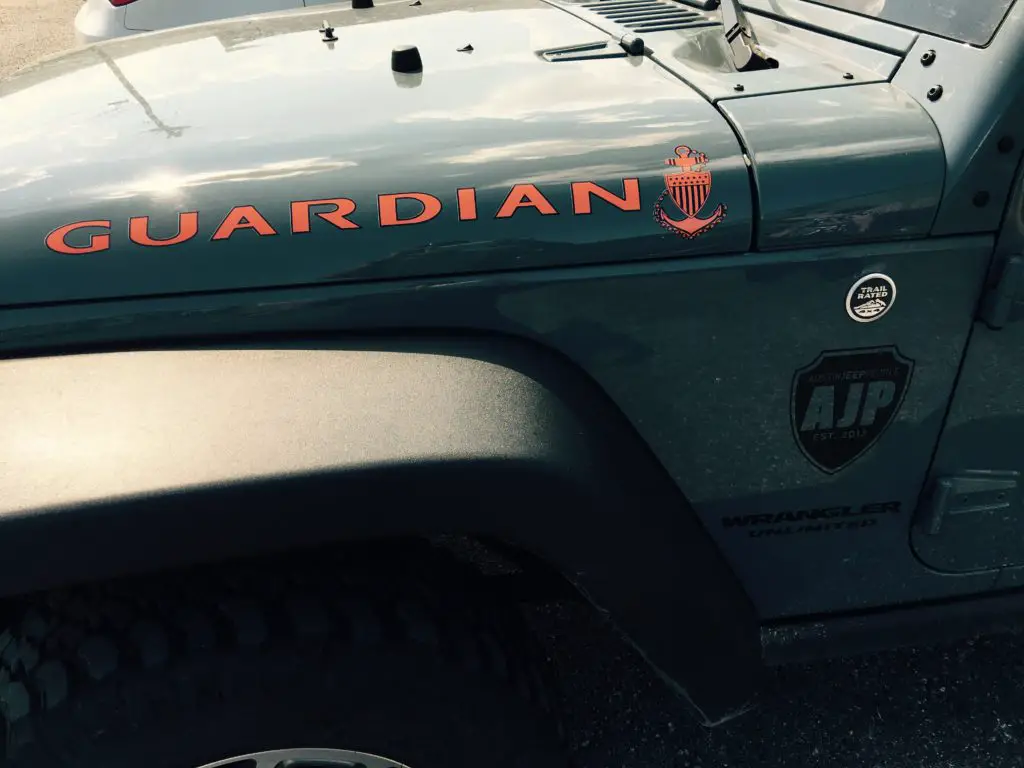 Our Jeep Rubicon, “GUARDIAN”
The name GUARDIAN is a tribute to my time in the United States Coast Guard. I spent 20+ years on Active Duty service and retired in 2010. The anchor with fouled chain is the insignia of the Chief which was my title when I retired. A huge shout out to Chris Quitugua and Jeremy Stillman for the design of the decal.
Would love to hear if this article was helpful to you. Also if you have any insight I may have missed please let me know. It is a learning process for me still. Probably always will be.
Until next time, keep it dirty and wheels side down.
~ Eric


That’s a great name! Love the design.
Thanks Mike! The designers of the decal were Chris Quitugua and Jeremy Stillman. If interested you can contact Jeremy who can put you in touch with Chris at Alpha Print Services in Round Rock, Texas. They are great guys who really came through. I’m proud to have this decal on my Jeep. Semper Paratus. ~ Eric
Looks cool. The Rubicon sticker is starting to peel on the driver side of my 2011. Not counting the specially designed decal, what did it cost for the custom install?
Eston, it the total on the install itself was under $50. I don’t remember how much but it was billed at 30 minutes labor though they took about 40 minutes to do it. The folks at Austin Extreme Graphics did a great job.
Hello, Chief Eric! GUÀRDIAN is an awesome name for your Jeep! I am also a CG Vet (AM2) and stopped here to get a DIY lesson on vinyl decal placement for my 77 CJ7. My decal reads 41MB-77CJ, which is a tribute to the WWII Jeep.
Great step by step lesson that I will be attending here shortly! Thanks for taking the time to publish for us! Semper Paratus!
Semper Paratus AM2! Make sure you upload a photo of your Jeep decals to our FB page so we can check it out! https://www.facebook.com/JeepsiesBlog/
Looking forward to seeing it! ~ E
Thank you for your service!
Thanks for the install tips, I hate crooked decals and this will prevent it for sure! This reminded me on how I installed a spoiler on my son’s BMW that was stick-on with 3M tape. Once it was in position I created a hinge with blue tape and flipped it up to remove the film and lowered back into position. I didn’t connect decals and spoiler installs using the same methods…you have inspired me to find my personal saying to avoid a belly button jeep!
Right on Steve! Hey I took some time off to spend with my son, but I’m back now full time. Glad you left a comment and that the install tips helped. I’ve got a bunch of new articles up on Jeepsies. Check ’em out! ~ Eric
Article was extremely helpful, thank you!!!
Antonio! Thanks for commenting. Sorry for the delay in response. I took a little time off to spend with my son, but I have a bunch of new articles up on staging2.hourlesslife.com. Check it out! ~ Eric
Great Job Brother….
Thanks DC1! Appreciate you taking the time to leave a comment. ~ Eric
Thank you!!!
I have finally come up with a name for my Jeep. Now need to find a local place to get it done. This was helpful.
Ingrid, what name did you come up with? I always love seeing the Jeep names on Jeeps. ~ Eric
Hi Eric, just wanted to thank you for the tutorial. I had no idea what “denatured alcohol” was before reading it. I went to home depot and got a 947ml bottle. Worked great! However, I didn’t know what to do with what was left in the bottle (like 95%)… Used it to start a campfire. Methyl hydrate is the best fire starter ever!
PS: Didn’t forget to send you 1$.
I can’t tell you how much I appreciate it every time someone takes the time to support Jeepsies even with $1. I’m telling you that if half my readers did this I could do articles fulltime. This is a dream of mine so seriously, thank you!
Glad that the article was helpful to you! ~ Eric